Tutorial
This tutorial will guide you through installing dot2net and creating your first network topology.
dot2net implements Topology-driven Configuration, an approach that separates the network's structure from its generalized configuration settings. Instead of manually editing multiple device configurations when adding a single router, dot2net generates all required configuration files from a simple graph (DOT) and reusable configuration templates (YAML).
The two files, taken together, are what this documentation calls a topology. Basic Concepts says why, and what is called what when only one half is meant.
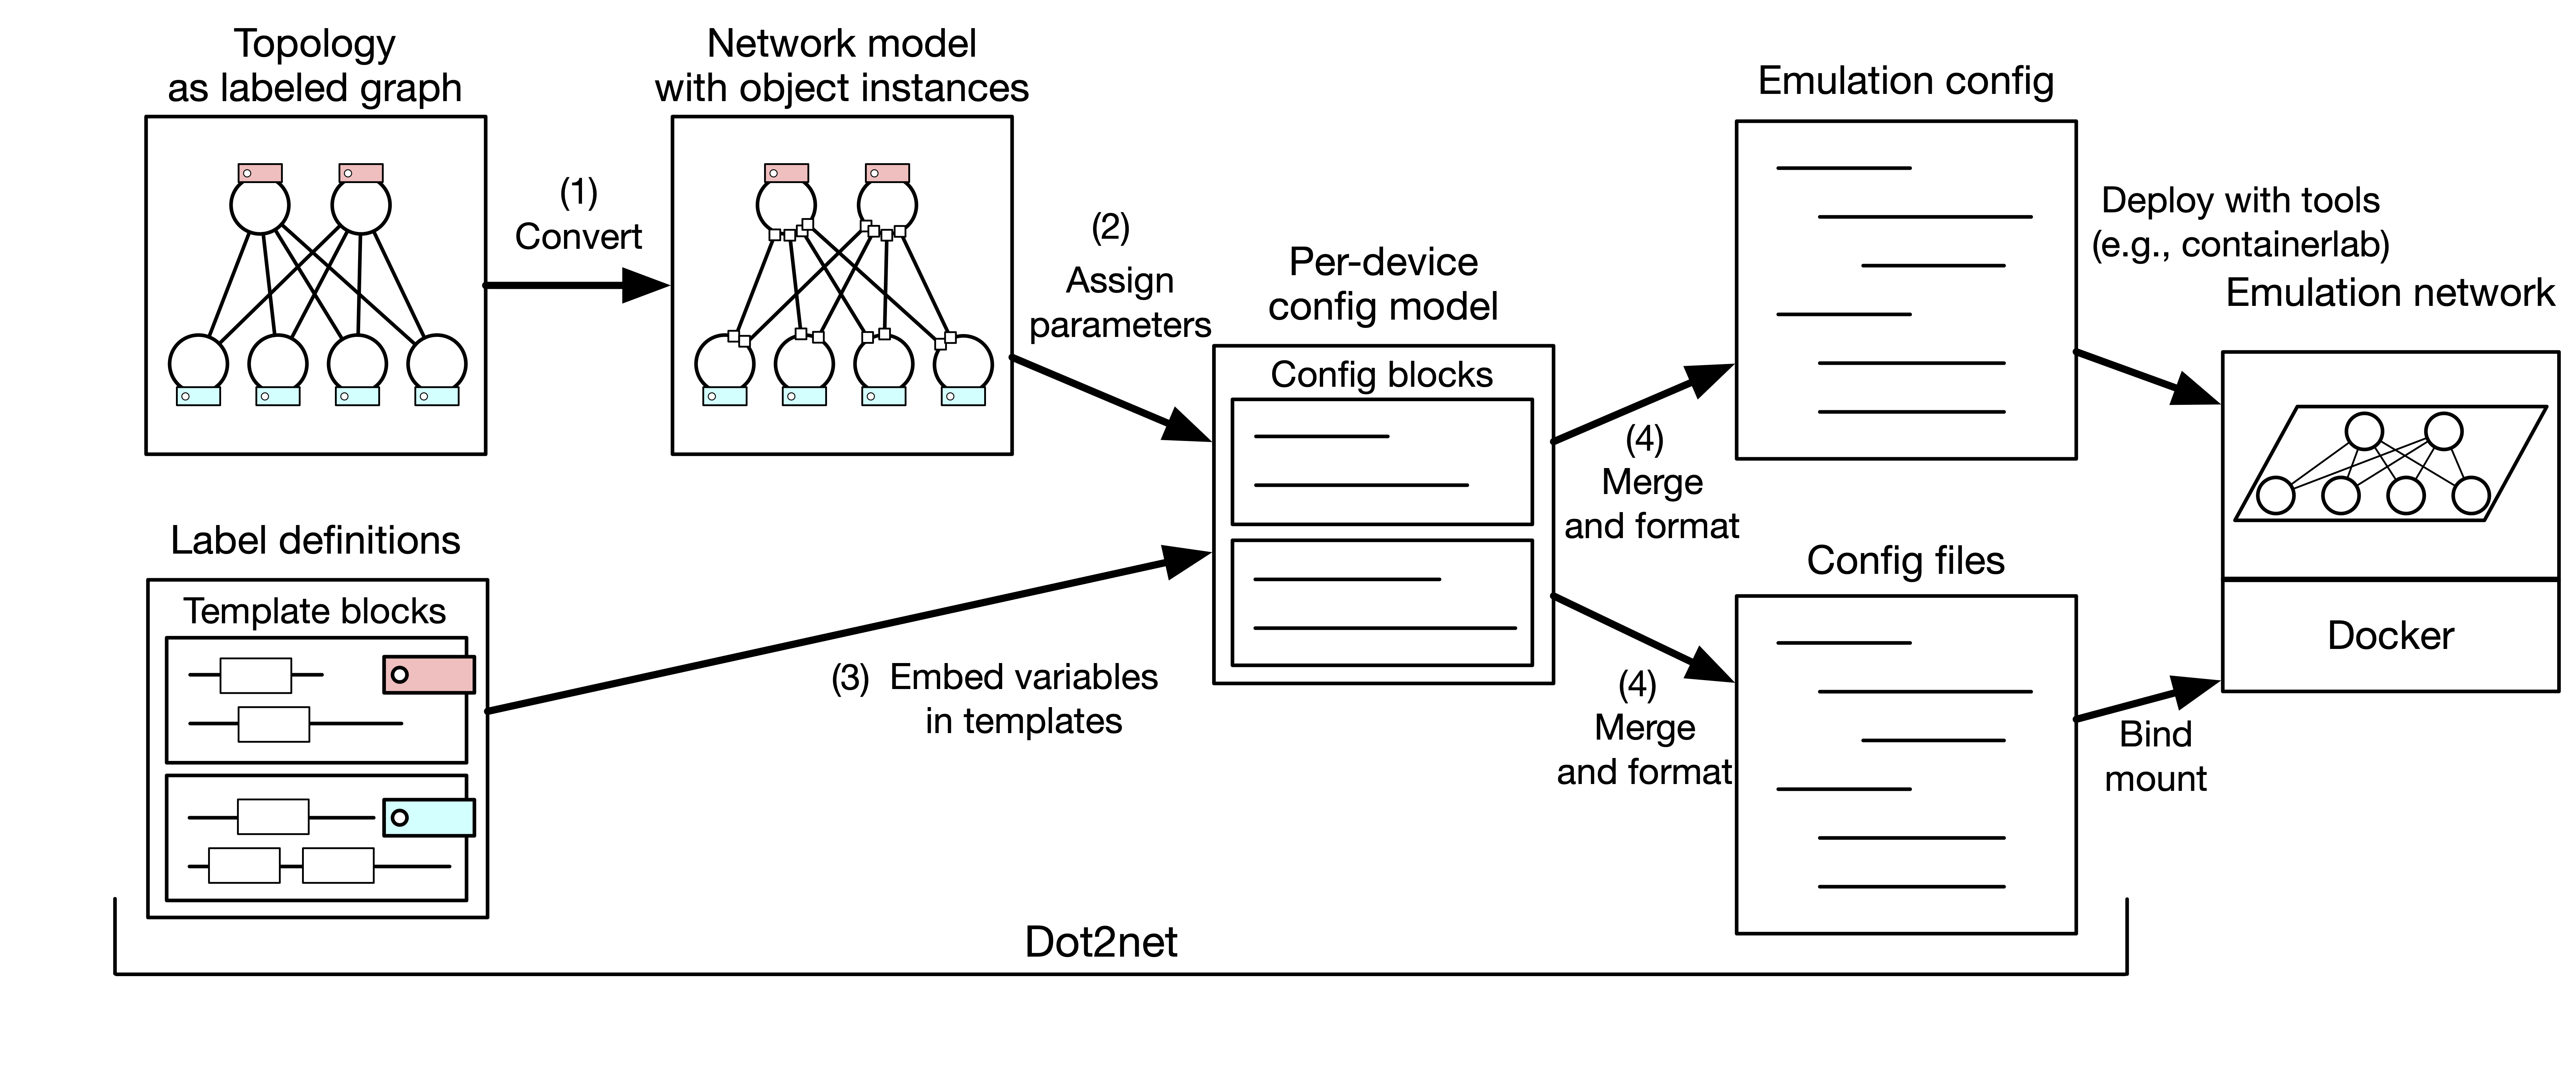
dot2net transforms network topology into emulation-ready configurations through a 4-step process:
- Convert: Parse DOT topology into network model with object instances
- Assign parameters: Automatically calculate IP addresses, interface names, and other parameters
- Embed variables: Process templates with assigned parameters to generate config blocks
- Merge and format: Combine config blocks into final configuration files and deployment specifications
This separation enables topology-driven configuration where changing the network layout only requires modifying the DOT file, while all device configurations are automatically regenerated.
- Go 1.23+ OR Docker
- Using Containerlab/TiNET: Linux environment with Docker and sudo privilege
- Manual deployment: Any environment (dot2net generates config files only)
- Containerlab - container-based network labs
- TiNET - Linux namespace-based emulation
- Kathara - container-based emulation built for teaching
- Manual deployment to physical/virtual equipment
# Clone the repository
git clone https://github.com/cpflat/dot2net.git
cd dot2net

# Build
go build .# Clone the repository
git clone https://github.com/cpflat/dot2net.git
cd dot2net
# Build using Docker
docker run --rm -i -v $PWD:/v -w /v golang:1.23.4 go build -buildvcs=falseAfter building, you'll have a dot2net executable in your current directory.
Let's create a simple 3-router network to understand the basics.
cd tutorial/This directory contains a pre-configured example with:
-
input.dot- Network topology -
input.yaml- Configuration templates
View input.dot:
digraph {
    r1 [xlabel="router"];
    r2 [xlabel="router"];
    r3 [xlabel="router"];

    r1 -> r2 [dir="none"];
    r2 -> r3 [dir="none"];
}
This defines:
- Three routers (r1, r2, r3) with class label "router"
- Two bidirectional connections: r1↔r2 and r2↔r3
../dot2net build -c ./input.yaml ./input.dotThis command:
- Reads the topology from
input.dot - Applies configuration from
input.yaml - Generates output files:
-
r1/,r2/,r3/- Node-specific configuration directories -
topo.yaml- Containerlab deployment specification -
spec.yaml- TiNET deployment specification -
kathara/lab.conf- Kathara lab definition (withmodule: [kathara])
-
Choose one deployment method:
# Deploy
sudo containerlab deploy --topo topo.yaml

# Test connectivity
docker exec -it clab-tutorial-r1 ping <r3_ip>

# Cleanup
sudo containerlab destroy --topo topo.yaml# Create network namespace and interfaces
tinet up -c spec.yaml | sudo sh -x
# Apply configurations
tinet conf -c spec.yaml | sudo sh -x
# Test connectivity (from host)
sudo ip netns exec r1 ping <r3_ip>
# Cleanup
tinet down -c spec.yaml | sudo sh -xThe lab is the kathara/ directory, so Kathara is run from inside it:
cd kathara
sudo kathara lstart --noterminals

# Test connectivity
sudo docker exec "$(sudo docker ps --filter name=_r1_ -q | head -1)" ping <r3_ip>

# Cleanup
sudo kathara lcleanThis is the part worth doing, because it is the whole claim. Add a fourth router to
input.dot — one node and one link:
digraph {
    r1 [xlabel="router"];
    r2 [xlabel="router"];
    r3 [xlabel="router"];
    r4 [xlabel="router"];        // added

    r1 -> r2 [dir="none"];
    r2 -> r3 [dir="none"];
    r3 -> r4 [dir="none"];       // added
}
Do not touch input.yaml. Generate again:
../dot2net build -c ./input.yaml ./input.dotr4/ now exists, with its own FRR configuration. r3 has a second interface, an
address on it, and an OSPF network line for the new segment. topo.yaml and
spec.yaml carry the new node and the new link. Nothing had to be renumbered, and
nothing in the configuration had to be told that the network grew.
Compare that with doing it by hand: a new r4 block in topo.yaml, a new directory
with three files in it, an address chosen so as not to collide, and an edit to r3
because its neighbour set changed. Four places, and only the last one is easy to
forget.
input.yaml never knew how many routers there were. That is what makes a graph
twenty times the size work the same way — see
Try a larger, real topology.
Defines the network structure using DOT language (Graphviz format):
- Nodes: Network devices (routers, switches, hosts)
- Edges: Connections between devices
- Labels: Class assignments for configuration
Key syntax:
digraph {
    node_name [xlabel="class_label"];
    node1 -> node2 [dir="none"];  # Bidirectional connection
}
Learn more: DOT File Syntax
Defines configuration behavior using YAML:
- Classes: Reusable configuration patterns (NodeClass, InterfaceClass, ConnectionClass)
- Templates: Go template files for generating device configs
- IP Policies: Address assignment rules
Key sections:
file:                        # the files to generate
  - name: frr.conf
    path: /etc/frr/frr.conf  # where it goes inside the container

layer:                       # address spaces and how they are handed out
  - name: ip
    default_connect: true
    policy:
      - name: ip
        range: 10.0.0.0/16
        prefix: 24

nodeclass:                   # what a node of this class carries
  - name: router
    values: {image: quay.io/frrouting/frr:8.5.4}
    config:
      - file: frr.conf
        template: ["hostname {{ .name }}"]

interfaceclass:              # and an interface of this class
  - name: default
    config: []
Learn more: YAML Configuration
After running dot2net build, you'll see:
-
r1/,r2/,r3/: Node-specific configuration directories- Contains device configs (e.g., FRR
daemons,frr.conf)
- Contains device configs (e.g., FRR
-
topo.yaml: Containerlab deployment specification -
spec.yaml: TiNET deployment specification
dot2net provides powerful features for network configuration management:
- Automatic Parameter Assignment: IP addresses, interface names, and other parameters are calculated automatically
- Flexible Class System: Reusable node, interface, connection, and group configurations
- Template-Based Configuration: Generate any configuration format using Go templates
- Multi-Platform Support: TiNET and Containerlab emulation platforms
- Conflict Detection: Intelligent detection and reporting of configuration conflicts
- Scalable Design: Handle large networks with hundreds of nodes and connections
dot2net generates configurations for multiple deployment platforms:
- TiNET: Linux namespace-based network emulation
- Containerlab: Container-based network labs
- Manual deployment: Use generated configs for physical or virtual equipment
Now that you've created your first network, explore these topics:
- Basic Concepts - Understanding topology-driven configuration
- DOT File Syntax - Learn advanced topology definitions
- YAML Configuration - Master the class system and templates
- Best Practices - Design principles for scalable networks
- Template System - Create custom configuration templates
Problem: go build fails with dependency errors
Solution: Ensure you're using Go 1.23+ and run go mod download
Problem: Docker build fails Solution: Check Docker is running and you have network connectivity
Problem: Containerlab fails with permission error
Solution: Ensure you're using sudo when running containerlab deploy
Problem: TiNET commands fail Solution: TiNET requires Linux with network namespace support. Check you're on a Linux system with proper kernel support.
Problem: dot2net build fails with parsing errors
Solution: Validate your DOT syntax using dot -Tpdf input.dot -o test.pdf to check for syntax errors
Problem: IP address conflicts Solution: Review your YAML configuration's address assignment policies
For more help, visit the GitHub Issues page.